Create a Excel 2007 VSTO add-in: getting started
12 Feb 2010Excel VSTO Add-In Series
- Getting Started
- Custom Task Pane
- Ribbon
- WPF Control
- Tree View
- Excel Events
- Part 1 Wrap
- Go To Cell
- Read Worksheets
- Display Differences
- Msi Installer
- Code on GitHub
In the recent past, I have been developing solutions for clients using VSTO – Visual Studio Tools for Office – and I believe that VSTO is a technology which has a lot to offer. I used to write a lot of VBA code to automate Excel, but after spending the past 5 years or so writing C# code using .Net, I find VBA limiting, and the development environment extremely frustrating. So when I saw that Jon Peltier had begun a tutorial series on how to build a classic Excel add-in, I thought, why not do the same with VSTO?
My baseline objective will be to write an add-in which tracks the differences between two open worksheets, and allows the user to merge some of the contents, if appropriate.
As a secondary objective, I will try to showcase some of the benefits of using VSTO over VBA; for that reason, the add-in will be built for Excel 2007, and use the Ribbon, and .Net 3.5, so that we can use some WPF controls. I will do my best to highlight some of the differences between VBA and C# along the path, as well as highlight some important aspects of the Excel object model. As a result, some places will probably seem slow to the experienced .Net developer, and some others to the VBA veteran.
Unlike Jon, I have not written my add-in yet; I will share the successes and struggles as I progress along. The main tasks/areas we will have to cover are
- hooking the add-in to the Excel user interface,
- accessing the Excel objects through the add-in,
- creating custom controls to select sheets,
- identifying differences between worksheets,
- listening to Excel events,
- deploying the add-in.
I will likely dig into Excel 2010, .Net 4.0 and Visual Studio 2010 along the path, but given that Office 2007 hasn’t been adopted by all yet, this will not be my initial focus.
Getting started
In order to write our Excel 2007 VSTO add-in, we need:
- Excel 2007 (duh!)
- Visual Studio 2008 Professional Edition. Unfortunately, Visual Studio 2008 Express, the free edition of VS, does not support Office Automation.
- .Net 3.5
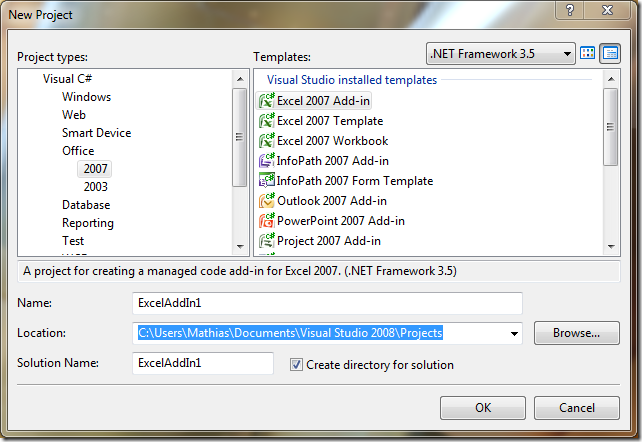
Open Visual Studio, and select File > New > Project. A wide variety of project types is available. Select Office > 2007, and in the list, pick Excel 2007 Add-in. I will name the add-in “ClearLines.Anakin”.

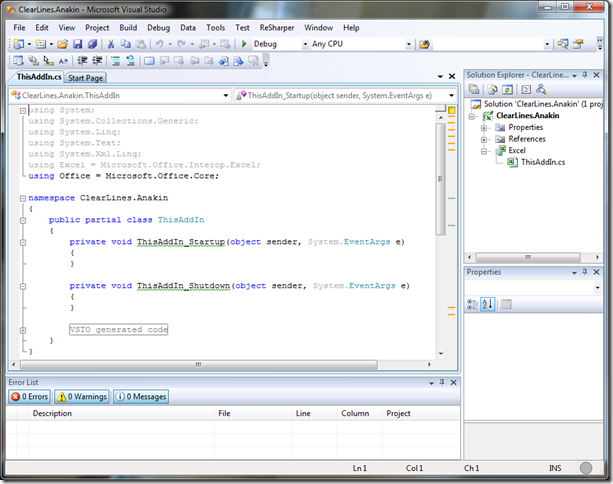
Once you click OK, you will see something like this appear:

Visual Studio automatically creates a stub for your solution, with a class ThisAddIn, which represents the core of your add-in. The class already contains two methods, ThisAddIn_Startup and ThisAddIn_Shutdown. The startup method is the “entry point” to your add-in: when a user opens Excel, the add-in is loaded, and this method executes. This is where you get your opportunity to create the entities your add-in will use. Similarly, when Excel closes, the Shutdown method executes, giving you a chance to perform some clean-up operation if required.
There is also a grayed out area market VSTO generated code; this is a region which contains code generated automatically by Visual Studio for the Add-In to work. You should leave that code alone, unless you know what you are doing.
Let’s illustrate, and start by adding two breakpoints in the add-in, by clicking the margin of the code editor – one at the opening of the startup method, one at the opening of the shutdown method:

Then, select the Debug menu, and chose “Start Debuging” (or hit F5). This will automatically start Excel, and break at our first breakpoint, before given the user access to Excel:

Your add-in is now running, and you have full access to Excel, showing you exactly how they interact. When you close Excel, before the application closes, you will similarly hit the second breakpoint.
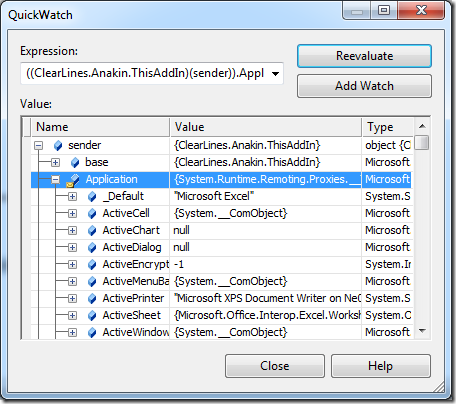
One of the nice aspects of working in Visual Studio is the debugging tools available. When hitting the second breakpoint, I can select (for instance) the “sender” object in the method, right-click, and select “QuickWatch”.

This will pop a window, which allows me to inspect the current state of the object, and drill into it:

Similar functions do exist in the VBA editor, but the usability in Visual Studio is just way better.
Our add-in does nothing for the moment. Just to show that we can, let’s re-create the grand daddy of all first applications, “Hello World”.
private void ThisAddIn_Startup(object sender, System.EventArgs e)
{
    var messageBox = MessageBox.Show("Hello, World!");
}

private void ThisAddIn_Shutdown(object sender, System.EventArgs e)
{
    var messageBox = MessageBox.Show("Good night, World!");
}
If you attempt to debug this “as is”, it will fail. The reason is that MessageBox is not “included by default” in the project. You need to add a reference to it in your project. To address this, right after the line using Office = Microsoft.Office.Core; at the top of the ThisAddIn class file, you can add the following line:
using System.Windows.Forms;
Alternatively, you can let Visual Studio attempt to do that for you. If you hover over MessageBox, you should see a little red tab appear on the right; click it, and in the menu which appears, click using System.Windows.Forms;, which will automatically insert the line at the top of the file.

Now let’s debug – you should see a “Hello, World!” message pop up when Excel starts, and “Good night, World”!” when you quit.
Before leaving for today, one last trick. If you close Visual Studio at that point, and open Excel, you will be greeted with a warm “Hello, World!”. The reason is that when you debug your add-in, it is installed on your machine, so that Office can find it, but it isn’t automatically removed when you exit Visual Studio. To avoid that issue, once you are done developing and debugging, before closing Visual Studio, go to the Build menu, and select “Clean Solution”. Et voila!
I hope you enjoyed that first installment! Next time, we’ll get into creating a custom task pane for our add-in, and hooking it up to the Ribbon. Until then, have a great week-end!
