Create an Excel 2007 VSTO add-in: go to cell
14 Apr 2010Excel VSTO Add-In Series
- Getting Started
- Custom Task Pane
- Ribbon
- WPF Control
- Tree View
- Excel Events
- Part 1 Wrap
- Go To Cell
- Read Worksheets
- Display Differences
- Msi Installer
- Code on GitHub
In the second part of this series, we will generate a comparison between two open spreadsheets, and create a user interface to navigate between the differences, and reconcile them if need be.
For today, let’s assume that the add-in has already figured out what the differences are, and build first a user interface that allows the user to navigate to the cells that have differences. In later posts, we will focus on actually generating these differences.
To achieve this, I will leverage the Goto method of Excel. Application.Goto(object reference, object scroll) will navigate to the range defined by reference. If scroll is set to true, it will force the window to scroll so that the range is the upper-left corner, otherwise it will scroll only if necessary.
This is a good starting point for design. A spreadsheet comparison will be a collection of differences, and each difference should map to a cell. One approach is to store the row and column of each difference, so that from a Difference object, we can retrieve the corresponding range, and go to it:
private void NavigateToDifference(Difference difference)
{
   var row = difference.Row;
   var column = difference.Column;
   var activeSheet = (Excel.Worksheet)this.excel.ActiveSheet;
   var differenceLocation = activeSheet.Cells[row, column];
   this.excel.Goto(differenceLocation, Type.Missing);
}
Let’s start by adding a Comparison folder in our solution, within the TaskPane folder, to store all the functionality related to that aspect, and create the Difference class, which represents a difference found between the same cell in two worksheets:
public class Difference
{
   public int Row
   {
      get;
      set;
   }

   public int Column
   {
      get;
      set;
   }
}
Obviously, this will need to be fleshed out later, to define what that difference is exactly, but for now, we only care about its location of the difference, so that we can navigate to it, so that will do.
Next, we need to create a user interface to navigate between the differences that have been identified between the worksheets. Let’s create a WPF user control “ComparisonView”, which will be responsible for displaying the Difference that is currently selected, and moving back and forth in the list of differences.
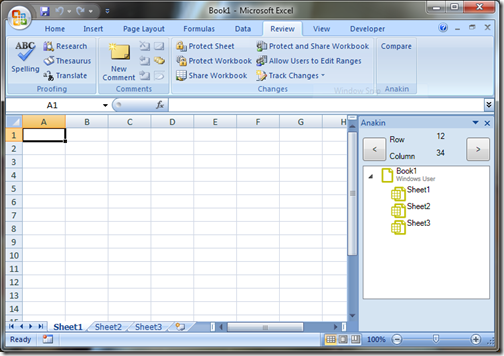
The user control will have two buttons, one to move forward, one backward; I added some slots in between, which I will use to display for now the row and column of the difference that is currently selected. Later on, we will refactor it and replace it with actual meaningful information, but for now, this will help us validate the behavior of the add-in.
The code below defined the control; we use a grid for the layout, with 4 columns, and 2 rows. The buttons are placed in columns 0 and 3, and span the 2 rows.
<UserControl x:Class="ClearLines.Anakin.TaskPane.Comparison.ComparisonView"
xmlns="http://schemas.microsoft.com/winfx/2006/xaml/presentation"
xmlns:x="http://schemas.microsoft.com/winfx/2006/xaml">
<Grid>
<Grid.RowDefinitions>
<RowDefinition Height="25" />
<RowDefinition Height="25"/>
</Grid.RowDefinitions>
<Grid.ColumnDefinitions>
<ColumnDefinition Width="35"/>
<ColumnDefinition Width="75"/>
<ColumnDefinition Width="*"/>
<ColumnDefinition Width="35"/>
</Grid.ColumnDefinitions>
<Button Grid.Row="0" Grid.Column="0" Grid.RowSpan="2"
Content="<"
Height="35"/>
<Button Grid.Row="0" Grid.Column="3" Grid.RowSpan="2"
Content=">"
Height="35"/>
<Label Grid.Row="0" Grid.Column="1" Content="Row"/>
<Label Grid.Row="1" Grid.Column="1" Content="Column"/>
<TextBlock Grid.Row="0" Grid.Column="2" Text="12"/>
<TextBlock Grid.Row="1" Grid.Column="2" Text="34"/>
</Grid>
</UserControl>
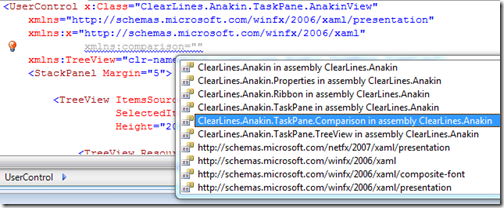
Now let’s add that control into our add-in, inside the AnakinView control. First, we need to add a reference to the namespace where the control resides:

We can now add our control in the AnakinView, by inserting it above the TreeView we already have in place. Let’s name it ComparisonView, so that we can access it by name from the AnakinView control:
<StackPanel Margin="5">
   <Comparison:ComparisonView x:Name="ComparisonView" />
   <TreeView ItemsSource="{Binding Path=ExcelViewModel.Workbooks}"
               SelectedItemChanged="SelectedItemChanged"
               Height="200">
Rebuild and debug: the new control, with its two big shiny buttons, is in place. We just need to add some code to it.

I will follow the same MVVM pattern as before, and bind the ComparisonView control to a ComparisonViewModel, which will be responsible for presenting the comparison to the UI. Let’s add a ComparisonViewModel class to the Comparison folder, with the following code:
using System.Collections.Generic;
using Excel = Microsoft.Office.Interop.Excel;

public class ComparisonViewModel
{
   private Excel.Application excel;
   private List<Difference> differences;

   public ComparisonViewModel(Excel.Application excel)
   {
      this.excel = excel;
      this.differences = new List<Difference>();

      // Temporary code
      var difference1 = new Difference() {Row = 3, Column = 3};
      var difference2 = new Difference() {Row = 3, Column = 5};
      var difference3 = new Difference() {Row = 5, Column = 8};
      this.differences.Add(difference1);
      this.differences.Add(difference2);
      this.differences.Add(difference3);
   }
}
I pass in the dependency to Excel explicitly in the constructor, because later on we will need to access the ActiveSheet, and to listen to some Excel events. The ComparisonViewModel will hold a list of differences, the comparison; right now I simply create an arbitrary list of differences, so that I can work off something and verify that the add-in works.
Let’s hook up the View and the ViewModel, through the setup method in the Add-in:
private void ThisAddIn_Startup(object sender, System.EventArgs e)
{
   // same as before

   var comparisonViewModel = new ComparisonViewModel(excel);
   var comparisonView = anakinView.ComparisonView;
   comparisonView.DataContext = comparisonViewModel;
}
Now we need to do 2 things: maintain a selected difference, which we will display in the control, and hook up the two buttons, so that when they are pressed, the next or previous difference in the list is selected.
Let’s get the SelectedDifference out of the way. We create a public property and a backing field, set the selected difference to the first one in the list in the constructor, and implement INotifyPropertyChanged, so that the UI gets informed of changes:
using System.ComponentModel;

public class ComparisonViewModel : INotifyPropertyChanged
{
   private Difference selectedDifference;

   public event PropertyChangedEventHandler PropertyChanged;

   public ComparisonViewModel(Excel.Application excel)
   {
      // same as before
      this.SelectedDifference = this.differences[0];
   }

   public Difference SelectedDifference
   {
      get
      {
         return this.selectedDifference;
      }
      set
      {
         if (this.selectedDifference != value)
         {
            this.selectedDifference = value;
            OnPropertyChanged("SelectedDifference");
         }
      }
   }

   protected void OnPropertyChanged(string propertyName)
   {
      var handler = this.PropertyChanged;
      if (handler != null)
      {
         handler(this, new PropertyChangedEventArgs(propertyName));
      }
   }
}
Now that we have a SelectedDifference, we can bind the View to the Row and Column of the selected difference:
<UserControl x:Class="ClearLines.Anakin.TaskPane.Comparison.ComparisonView"
    xmlns="http://schemas.microsoft.com/winfx/2006/xaml/presentation"
    xmlns:x="http://schemas.microsoft.com/winfx/2006/xaml">
    <Grid>
      // same as before
      <TextBlock Grid.Row="0" Grid.Column="2" Text="{Binding Path=SelectedDifference.Row}"/>
      <TextBlock Grid.Row="1" Grid.Column="2" Text="{Binding Path=SelectedDifference.Column}"/>
   </Grid>
</UserControl>
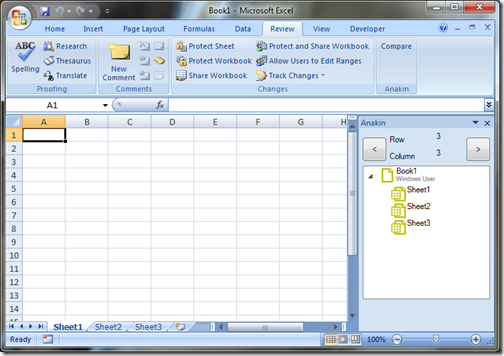
Rebuild and debug, and sure enough, the Add-In now displays the row and column of the first difference that we created in the constructor:

Now let’s deal with the buttons. Rather than write event handlers behind the view, I will use the WPF binding capabilities, and bind a command to the button. The benefit of this approach is that this moves all the code/logic in the viewmodel, which is much easier to test and work with than the view.
To do this, I will leverage the RelayCommand class, from the awesome MVVM foundation library of Josh Smith. I copied the file in the TaskPane folder, with only cosmetic changes. In a nutshell, this class allows you to bind a Command from the UI (such as clicking a button) to an “action” on the ViewModel. One nice feature of the Command binding approach is that the constructor takes in the Action to be executed, and a second, optional argument, a Predicate which returns whether or not the action can be executed. When a UI element is bound to a command that cannot be executed, it will disable itself, without extra code required.
This may sound a bit abstract or complicated, but after seeing the actual code, it should be fairly clear.
Let’s go through the code for the button that handles navigation to the next difference. We need to create a property to bind to, which will return a ICommand. The action that command should execute is to select the Difference that follows the one currently selected – but if the current selection is the last Difference in the list, the command should not be available.
Here is the code I wrote for this (only the changes to the original class have been added):
using System.Windows.Input;

public class ComparisonViewModel : INotifyPropertyChanged
{
   private ICommand goToNextDifference;

   public ICommand GoToNextDifference
   {
      get
      {
         if (this.goToNextDifference == null)
         {
            this.goToNextDifference = new RelayCommand(GoToNextDifferenceExecute, CanGoToNextDifference);
         }
         return this.goToNextDifference;
      }
   }

   private void GoToNextDifferenceExecute(object target)
   {
      var currentIndex = this.differences.IndexOf(SelectedDifference);
      currentIndex++;
      this.SelectedDifference = this.differences[currentIndex];
   }

   private bool CanGoToNextDifference(object arg)
   {
      return (this.differences.IndexOf(SelectedDifference) < this.differences.Count - 1);
   }
}
Now hooking up the button in the ComparisonView to the Command is a one-liner:
<pre class="brush: xml; toolbar: false;"><UserControl x:Class="ClearLines.Anakin.TaskPane.Comparison.ComparisonView"
    xmlns="http://schemas.microsoft.com/winfx/2006/xaml/presentation"
    xmlns:x="http://schemas.microsoft.com/winfx/2006/xaml">
    <Grid>
      // same as before
      <Button Grid.Row="0" Grid.Column="3" Grid.RowSpan="2"
              Command="{Binding Path=GoToNextDifference}"
              Content=">"
              Height="35"/>
   </Grid>
</UserControl>
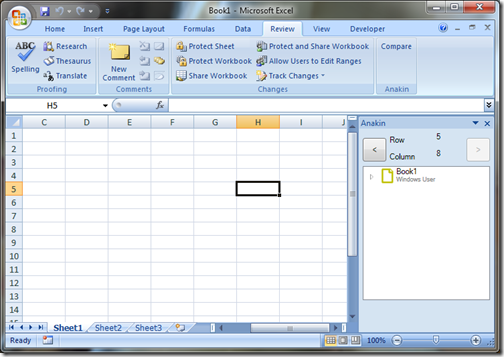
If you build and run the add-in now, what you will see is that when you press the button that we just hooked up, the Row and Column displayed will change and go through all the values we added in the list of differences, until we hit the 3rd and last one, at which point the button is grayed out, because the command cannot be executed.
I’ll leave to the reader to add the same code for the other button as an exercise. Let’s close this post by adding the final touch, so that when the button is clicked, the ActiveSheet “navigates” to the corresponding cell. We just need to add the code for the NavigateToDifference method that was presented in the opening of this post in the ComparisonViewModel, and update the GoToNextDifferenceExecute and GoToPreviousDifferenceExecute methods to call it:
private void GoToNextDifferenceExecute(object target)
{
   var currentIndex = this.differences.IndexOf(SelectedDifference);
   currentIndex++;
   this.SelectedDifference = this.differences[currentIndex];
   this.NavigateToDifference(this.SelectedDifference);
}
And we are done! At that point, when a button is pressed, it updates the selected difference from the list, displays its location in the control, and goes to it in the actual spreadsheet.

Now that we know how to deal with a list of differences, we can focus on how to create that list, which will be the focus of the next episodes. Stay tuned, and please let me know if you have suggestions to make this better!
