Finding Text in a PowerPoint slide with C#
08 Aug 2010I am currently on a project which involves creating a PowerPoint VSTO add-in. I have very limited experience with PowerPoint automation, so before committing to the project, I thought it would be a good idea to explore a bit the object model, to gauge how difficult things could get, and I set to write a small PowerPoint add-in which would automatically translate slides. Sounds like a simple enough project, how difficult could it be?
Turns out, not too difficult, but not completely trivial either. I discovered quickly that the PowerPoint object model, unlike most Office applications, doesn’t have much (any?) documentation for the .Net developer; the best I found is the VBA PowerPoint 2007 developer reference, which gives a decent starting point to figure out what the objects are about. So I thought I would share my exploration of the PowerPoint jungle, and hopefully spare some trouble to other .Net developers.
The plan
The objective is simple: write an add-in which allows the user to
- select a language to translate from, and a language to translate to,
- create a duplicate of the current slide, translating all the text and keeping the layout
The plan will be to use Google Translate to perform the translation. In order to do that, we will nedd to extract out all pieces of text that require translating.
Finding all the text in a slide
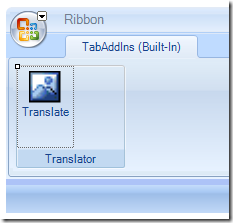
Lets’ start by identifying where we have text in the current slide. Let’s first create a PowerPoint 2007 Add-in project in Visual Studio. To keep things simple for now, we will add a Ribbon control with a button, and when that button is clicked, we’ll start working on the current slide:

Double-click on the Button (I renamed my button translateButton) to generate an event handler for the Click event, and get the current Slide:
private void translateButton_Click(object sender, RibbonControlEventArgs e)
{
   var powerpoint = Globals.ThisAddIn.Application;
   if (powerpoint.ActivePresentation.Slides.Count > 0)
   {
      var slide = (PowerPoint.Slide)powerpoint.ActiveWindow.View.Slide as PowerPoint.Slide;
   }
}
Using the static class Globals, I access the PowerPoint application. First, I check that the active presentation has a slide (Unlike Excel for instance, where a Workbook must contain at least a Worksheet, PowerPoint can have a Presentation with no slide), and then I navigate to the Slide that is currently active in the ActiveWindow.View. Note that View.Slide returns an object, so we need to explicitly cast it to a Slide.
Now that we have a Slide in our hands, we need to search for text in it. The visible items on a slide are Shapes. Let’s add the following code, and run it:
foreach (var item in slide.Shapes)
{
   var shape = (PowerPoint.Shape)item;
   MessageBox.Show(shape.Name);
}
Interestingly, if you run this on an empty, default slide, you will see names like “Title 1” and “Content Placeholder 2” pop up in the message box. Even the default placeholders are Shapes.
Out of all these Shapes, which could be anything, from a video to a geometric shape, we need to find the ones which contain text. To do this, we will use Shape.HasTextFrame, a property which indicates whether the Shape can contain text. Naively, I expected this property to be a boolean – but that would be too simple. It’s actually an enum, Microsoft.Office.Core.MsoTriState, which, fascinatingly, has 5 possible values: msoTrue, msoFalse (so far so good), msoCTrue, msoTriStateMixed, and msoTriStateToggle. I am still not quite clear what the three last ones are, but I’ll happily ignore that for now.
HasTextFrame means that the Shape could contain text, and not that it does. Let’s check whether the shape has text, and finally, after unwrapping all these layers, we can access the Text of the Shape, through its TextRange property:
if (shape.HasTextFrame == MsoTriState.msoTrue)
{
  if (shape.TextFrame.HasText == MsoTriState.msoTrue)
  {
     var textRange = shape.TextFrame.TextRange;
     var text = textRange.Text;
     MessageBox.Show(text);
  }
}
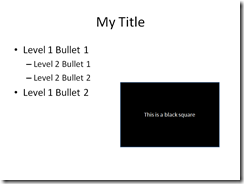
If you run the add-in on a Slide like this one, you should see that it successfully finds the 3 pieces of text, in the title, the content, and in the black square.

However, if you dig in a bit in the Text from the main content, you’ll see that the actual string looks something like this:
Level 1 Bullet 1\rLevel 2 Bullet 1\rLevel 2 Bullet 2\rLevel 1 Bullet 2
Besides our text, it also contains \r, the character for Carriage Return, which indicates the end of a paragraph. This means that if we want to preserve the layout of the slide, we’ll have to pay attention not to mess with the line breaks when manipulating the Text. In our next installment, we’ll look into that, and explore the TextRange property.
