
Auto-complete quick-search WPF ListBox
28 Sep 2010An interesting user interface issue came up in the project I am working on right now. In a nutshell, the user needs to select an item from a list of existing items. This sounds straightforward, except that the list of items has hundreds of elements. Clearly, a combo box or a list box won’t do the job – we need a convenient way to reduce the choices and help the user find what he needs.
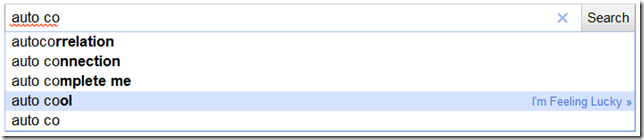
One suggestion I liked was to use something similar to an auto-complete: type in a few letters, and show only “relevant” items to chose from:
While digging into the question, I came into a .NET interface I didn’t know, ICollectionView. Essentially, it is a collection that is suitable for WPF databinding, and also has filtering capabilities. It stores a source collection, which contains all the items, but when a filter is applied to it, WPF will only “see” the filtered results.
Displaying a standard list
Let’s first create a WPF application, and warm up by adding a simple class, Product:
public class Product
{
   public string Name
   {
      get;
      set;
   }
}
Now let’s add a WPF UserControl, SearchAndSelectView.xaml. The control has a TextBlock, where we will display the name of the selected Product, a TextBox, where the user will type in the filtering text, and a ListBox, where we will display a selection of Products.
<UserControl x:Class="QuickSearchAndSelect.SearchAndSelectView"
             xmlns="http://schemas.microsoft.com/winfx/2006/xaml/presentation"
             xmlns:x="http://schemas.microsoft.com/winfx/2006/xaml"
             xmlns:mc="http://schemas.openxmlformats.org/markup-compatibility/2006"
             xmlns:d="http://schemas.microsoft.com/expression/blend/2008"
             mc:Ignorable="d">
   <StackPanel Width="150">
      <TextBlock Text="{Binding Path=SelectedProduct.Name}"/>
      <TextBox x:Name="Filter"/>
      <ListBox Height="150" x:Name="Products"
               ItemsSource="{Binding Path=Products}"
               SelectedItem="{Binding Path=SelectedProduct}">
         <ListBox.ItemTemplate>
            <DataTemplate>
               <StackPanel>
                  <TextBlock Text="{Binding Path=Name}"/>
               </StackPanel>
            </DataTemplate>
         </ListBox.ItemTemplate>
      </ListBox>
   </StackPanel>
</UserControl>
Now we will create a ViewModel class to bind to, exposing a ICollectionView of Product, which we will populate with test data, and a SelectedProduct. Note the intriguing syntax to fill in the ICollectionView, using CollectionViewSource.
public class SearchAndSelectViewModel
{
   private ICollectionView products;
   private Product selectedProduct;

   public SearchAndSelectViewModel()
   {
      var myProducts = new List<Product>();

      myProducts.Add(new Product() { Name = "Asparagus" });
      myProducts.Add(new Product() { Name = "Broccoli" });
      myProducts.Add(new Product() { Name = "Chard" });
      myProducts.Add(new Product() { Name = "Dandelion" });
      myProducts.Add(new Product() { Name = "Endive" });
      myProducts.Add(new Product() { Name = "Fennel" });
      myProducts.Add(new Product() { Name = "Jicama" });
      myProducts.Add(new Product() { Name = "Kale" });
      myProducts.Add(new Product() { Name = "Lettuce" });
      myProducts.Add(new Product() { Name = "Potatoes" });
      myProducts.Add(new Product() { Name = "Rhubarb" });

      this.products = CollectionViewSource.GetDefaultView(myProducts);
   }

   public ICollectionView Products
   {
      get
      {
         return this.products;
      }
   }

   public Product SelectedProduct
   {
      get
      {
         return this.selectedProduct;
      }
      set
      {
         if (this.selectedProduct != value)
         {
            this.selectedProduct = value;
         }
      }
   }
}
Add the control to the MainWindow, name it SearchAndSelectView, and bind the control to the view model:
public partial class MainWindow : Window
{
   public MainWindow()
   {
      InitializeComponent();
      this.SearchAndSelectView.DataContext = new SearchAndSelectViewModel();
   }
}
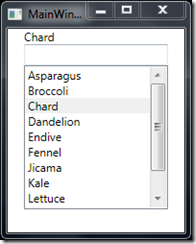
If you run the application at that point, you should see something like this. Nothing we couldn’t have done with a standard ObservableCollection so far, but it’s a start.
Creating a simple filter
So how do we go about filtering that list? ICollectionView has a Filter property, which takes a Predicate<object>. Think of a Predicate as a method which given an object, will return true or false; in our specific case, true means “the object should be included in the list”.
Let’s illustrate with a simple example, and filter out any Product that doesn’t contain the letter A in its name.
To do this, let’s add the following method to the View Model:
public bool NameContainsA(object item)
{
   var product = item as Product;
   if (product == null)
   {
      return false;
   }

   return product.Name.ToUpperInvariant().Contains("A");
}
To apply the filter to the list, simply add a line to the constructor, and right after the part where we set the contents of the source collection, simply set the filter:
this.products = CollectionViewSource.GetDefaultView(myProducts);
this.products.Filter = NameContainsA;
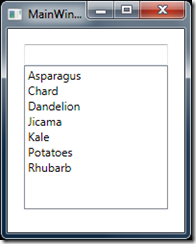
Now when you run the code, you should see something along these lines – all the products with no A are gone. Bye-bye, broccoli and endives.
Dynamic filtering
This is nice, but it’s still not very helpful. What we would really like is a filter which can be dynamically changed by the user, and automatically updates the visible contents of the list. We will do this by modifying our filter so that instead of checking whether the name contains “A”, it will verify whether the name contains whatever the user has typed in the TextBox.
First, let’s store the current text of the TextBox in the view model, and update it live, as the user types. By default, the ‘Text’ binding of the ‘TextBox’ will be updated only when the ‘TextBox’ loses focus; to update “as we go”, we need to modify our xaml a bit:
<TextBox x:Name="Filter" Text="{Binding Path=Filter, UpdateSourceTrigger=PropertyChanged}"/>
Now we need to add a ‘Filter’ property to the ‘View Model’, to capture the Text of the textbox, modify our filtering method to use the Filter instead of the hard-coded value, and set this.products.Filter to ContainsFilter:
private string filter;

public string Filter
{
   get
   {
      return this.filter.ToUpperInvariant();
   }
   set
   {
      if (this.filter != value)
      {
         this.filter = value;
         this.Products.Refresh();
      }
   }
}

private bool ContainsFilter(object item)
{
   var product = item as Product;
   if (product == null)
   {
      return false;
   }

   if (string.IsNullOrEmpty(this.Filter))
   {
      return true;
   }

   if (product.Name.ToUpperInvariant().Contains(this.Filter))
   {
      return true;
   }

   return false;
}
And that’s it! If you run the application at that point, you should see something like this:

As you type in different strings, the list updates and displays only products that have a name containing that specific substring. Endives and Fennel are back.
One thing I couldn’t figure out how to do yet is to automatically select the item in the list, if only one item is left – why not spare the user a click if you can? But I couldn’t find anything like a count of the visible items, so for the moment, there is still that extra click in the way of bliss. Anyone knows how to do that?