
Creating an Azure Function in F# from the ground up (Part 2)
06 Mar 2017In our last post, we went through setting up a simple Azure Function App through the portal. Starting from a local script that retrieved exchange rates from Yahoo and posted an update on Slack, we converted part of the code, using a Timer function to automatically make web requests every 15 seconds.
Today, we will finish turning our script into a Function App, illustrating as many useful tips as we can in the process. Among others, we’ll see how to consume NuGet packages, use queues (and more generally bindings) to allow communication between functions, and upload and reference arbitrary files.
Creating a function triggered by a Queue
So far, we have ported the first half of our script, pulling exchange rate data from Yahoo every 15 seconds. What we have left to do is to port the second half, creating a nicely-formatted message and posting it to Slack. Let’s do that now.
Of course, we could simply add that code to our existing function, and execute it all in one single script. However, this is a bit smelly. The two activities are distinct responsibilities: perhaps we will later send an update to things other than Slack; perhaps we will create other functions to retrieve different rates, and also post them to Slack. Let’s decouple the two activities, and create a separate function, which will just post to Slack.
Clearly this new function cannot be a Timer trigger. What we want here is a function which, whenever a new exchange rate has been retrieved, will execute and do its thing.
We will achieve that by using a different trigger, a Queue trigger: when a message is found in a queue, grab the message, and do something with it.
In the Portal, create a new function in F#, selecting the QueueTrigger-FSharp template this time. The screen we are presented with is mostly the same as the TimerTrigger screen we discussed in the previous post, with a couple of differences:
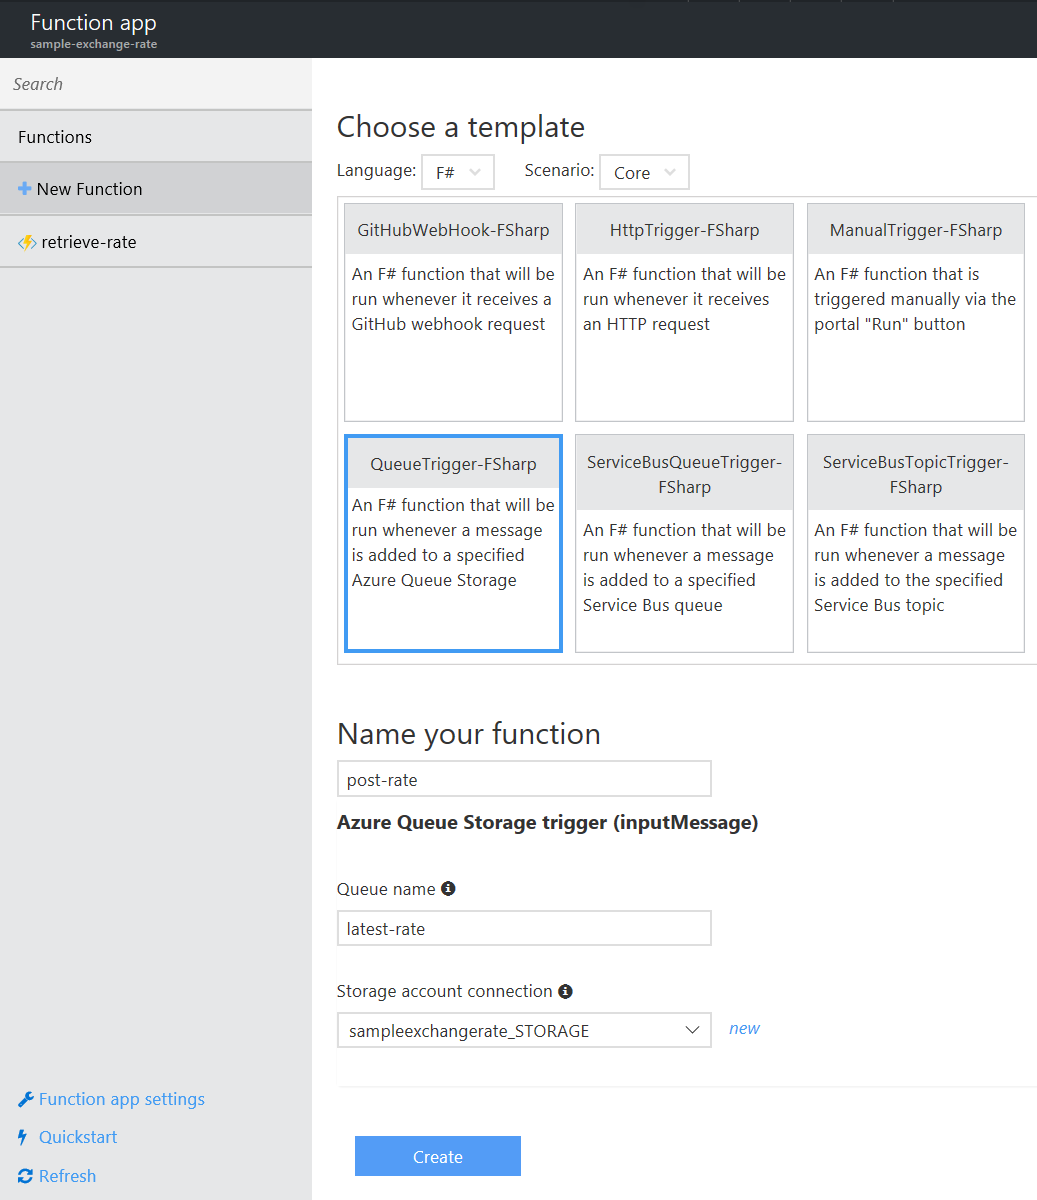
We still need to supply a name for the function - here post-rate - but instead of defining a CRON schedule, we have to define two things:
- a Queue name, the name of the queue where the function should be looking for messages,
- a Storage account connection, specifying where that queue is located, or, more specifically, its storage account.
Instead of using its default name, let’s rename the queue to latest-rate, which is more explicit. For the storage account, instead of the default selection, AzureWebJobsDashboard, we’ll choose “new” (on the right side of the drop-down box). This reveals all the existing storage account we own that are located in the same zone as our app, with an option to create a different one if we wanted to do so.
We already have a storage account, which was provisioned when we created the whole Function App, the sampleexchangerate account. There isn’t much of a point in creating a new one, so let’s use it.
Note: AFAIK,
AzureWebJobsDashboardis simply an alias for the default storage account that was created with the app; I could also have kept it as-is, and changed it mainly to show that other accounts could be used.
Hit Create, and here we go - we have a new function template ready for us to play with, with a run.fsx script, and its function.json file.
Understanding the Queue Triggered Function
The template script itself is pretty straightforward:
let Run(inputMessage: string, log: TraceWriter) =
    log.Info(sprintf "F# Queue trigger function processed: '%s'" inputMessage)
The Run function expects a string called inputMessage, the message that will be pulled from the queue as a raw string, and a TraceWriter to log activity.
The function.json file is equally simple:
{
  "bindings": [
    {
      "name": "inputMessage",
      "type": "queueTrigger",
      "direction": "in",
      "queueName": "latest-rate",
      "connection": "sampleexchangerate_STORAGE"
    }
  ],
  "disabled": false
}
As for our earlier Timer example, it directly reflects what we specified in the Portal user interface. Let’s make a small change here, and rename inputMessage as newRateMessage, which is more explicit.
Save, and take a look at the logs:
2017-02-18T15:08:31.632 Function compilation error
2017-02-18T15:08:31.632 error AF003: Missing a trigger argument named 'newRateMessage'.
We now have a mismatch between the bindings and the code; let’s fix it, by renaming the first argument of the Run function, and the argument passed into the log.Info, from inputMessage to newRateMessage:
let Run(newRateMessage: string, log: TraceWriter) =
    log.Info(sprintf "F# Queue trigger function processed: '%s'" newRateMessage)
Everything is now back in order:
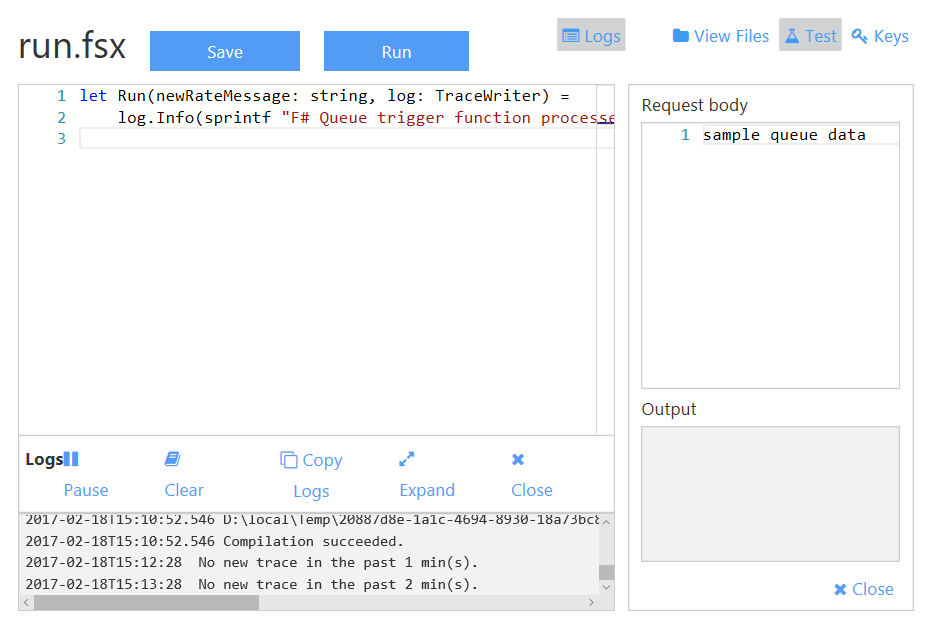
2017-02-18T15:10:52.546 Compilation succeeded.
Great, we now have a Function ready to run. Can we try it out? As it turns out, yes we can. Click on the Test button in the upper-right section of the screen, and you’ll see something like this - a Request body window where you can type in a message, which will be enqueued and processed.
Replace the default text “sample queue data” by, for instance “Hello F#”, hit “Run”, and you should see something like this:
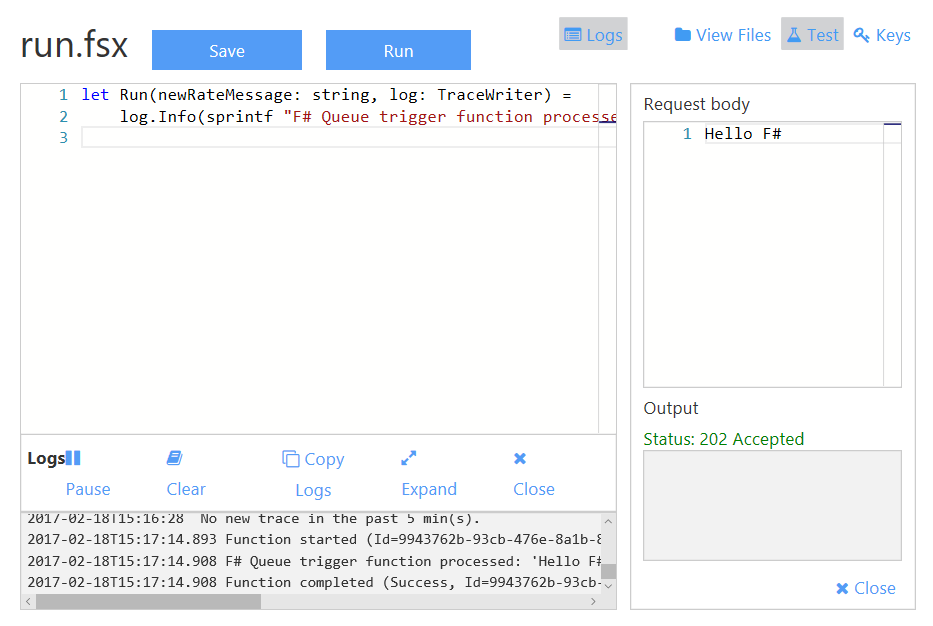
The Result windows show a “Status 202: message accepted”, and if you inspect the logs, you’ll see the following entry:
2017-02-18T15:17:14.893 Function started (Id=9943762b-93cb-476e-8a1b-8cbe9ec3735f)
2017-02-18T15:17:14.908 F# Queue trigger function processed: 'Hello F#'
2017-02-18T15:17:14.908 Function completed (Success, Id=9943762b-93cb-476e-8a1b-8cbe9ec3735f)
We are in business. If a message show up in the queue, it will be picked up and run through the script. Let’s go ahead now, and copy/paste/tweak the code from our local script into the Function, to post something into Slack:
open System.Text
#r "System.Net.Http"
open System.Net.Http

let Run(newRateMessage: string, log: TraceWriter) =

    log.Info(sprintf "F# Queue trigger function processing: '%s'" newRateMessage)

    let slackMessage = sprintf """{"text":"%s"}""" newRateMessage

    let client = new HttpClient()
    let url = "https://hooks.slack.com/services/your-key-goes-here"
    let message = new StringContent(slackMessage, Encoding.UTF8)

    client.PostAsync(url,message) |> ignore

    log.Info(sprintf "F# Queue trigger function processed: '%s'" newRateMessage)
… now let’s Test the function again with a “Hello F#” message, and take a look at our #exchange_rate channel on Slack - success!

Connecting Functions via Queues
Great. So now we have 2 small functions, each of them performing a separate piece of the overall task. What we need to do now is connect them together.
The only missing piece is for the first function to post a message to the same “updated-rate” queue the second function is watching. In the portal, let’s head back to the “retrieve-rate” function, and choose Integrate.
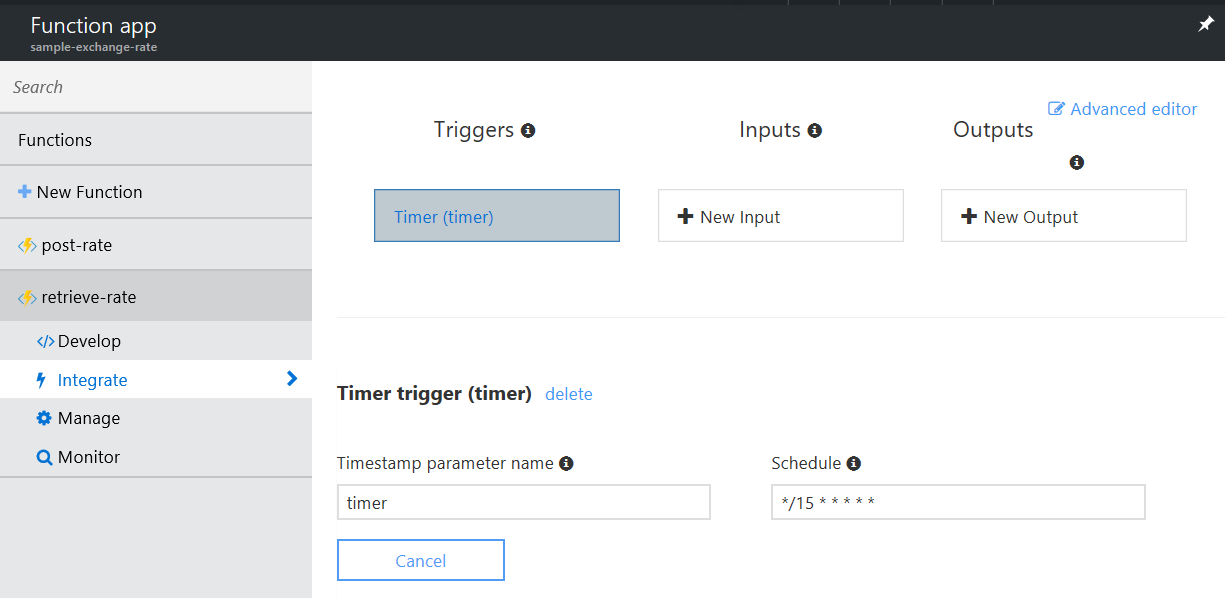
We already defined the trigger for that function, which we see in the Triggers section. We also have 2 other sections available, Inputs and Outputs. This is where you can specify other data the function could make use of (inputs), or produce (outputs).
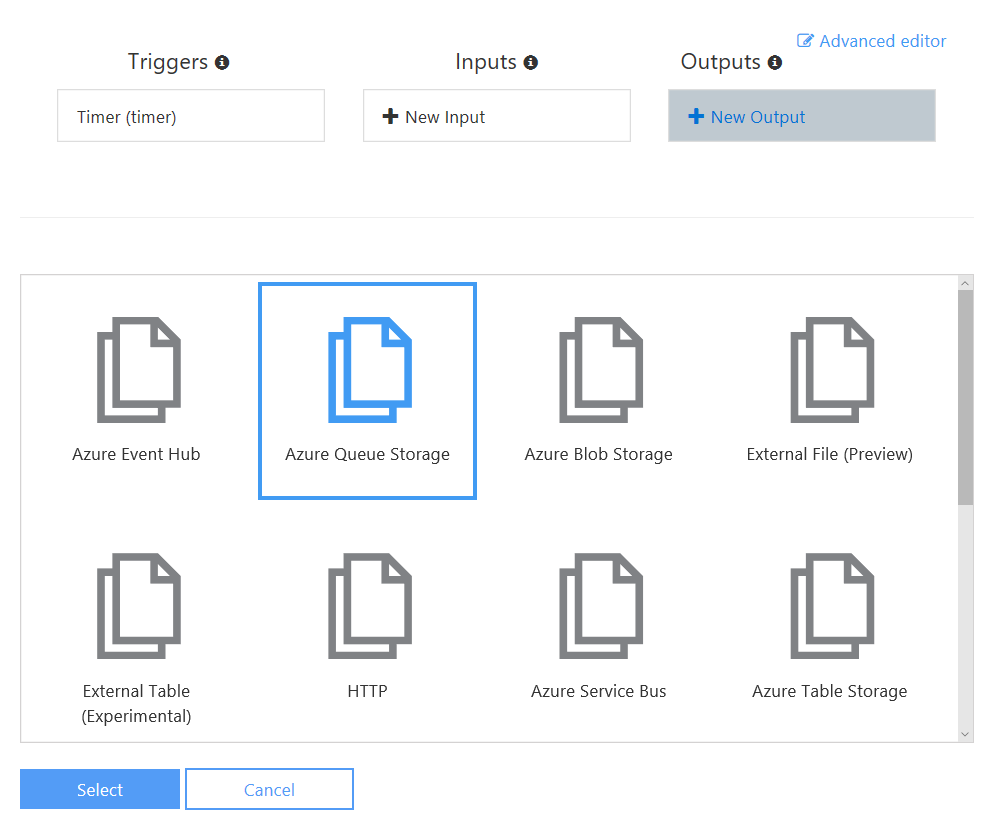
In our case, as the post-rate function is already watching for a queue, what we would like is for the retrieve-rate function to post something to that queue, as an output. Let’s make that happen: select New Output, Azure Queue Storage, and Select:
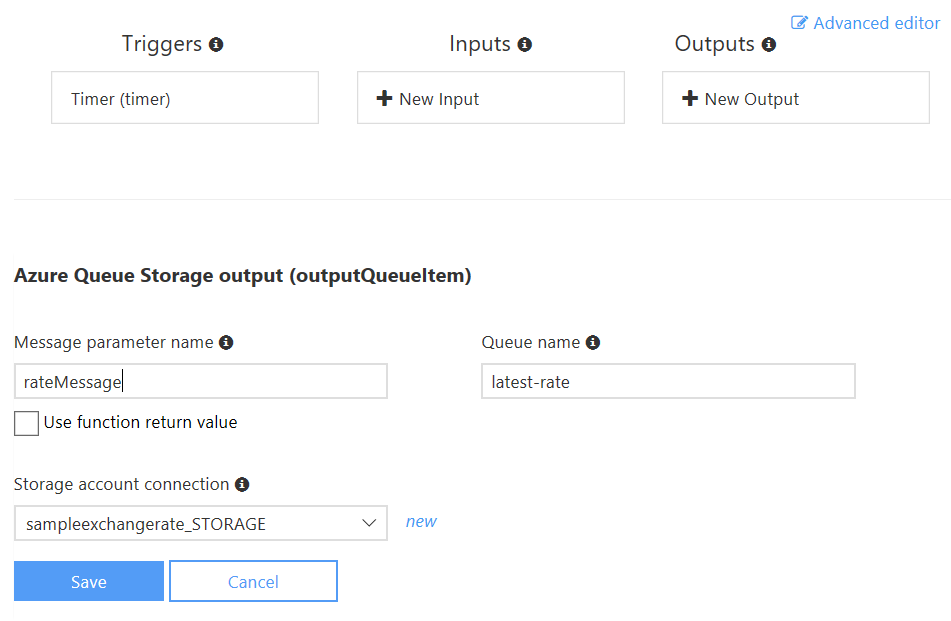
All we have to do at that point is specify what queue we want to talk to, latest-rate, and the corresponding storage account (sampleexchangerate_STORAGE) and give a name to the message, rateMessage:
If you inspect the function.json at that point, you’ll see it has been updated to reflect our changes:
{
  "bindings": [
    {
      "name": "timer",
      "type": "timerTrigger",
      "direction": "in",
      "schedule": "*/15 * * * * *"
    },
    {
      "type": "queue",
      "name": "rateMessage",
      "queueName": "latest-rate",
      "connection": "sampleexchangerate_STORAGE",
      "direction": "out"
    }
  ],
  "disabled": false
}
In addition to our timerTrigger, we have now a queue binding. Note that the name doesn’t include “Trigger”, which is what distinguishes the trigger from other bindings. Note also the "out" direction, which signals that this is an output.
Finally, let’s use that binding in our function, to post a message to the queue. First, we need to add the message to the Run function signature.
let Run(timer: TimerInfo, rateMessage: byref<string>, log: TraceWriter) =
    log.Info(
        sprintf "F# Timer trigger function executed at: %s"
            (DateTime.Now.ToString()))

    let client = new WebClient()
    let result =
        client.DownloadString(url)
        |> parse
        |> float

    rateMessage <- (sprintf "Latest rate is %f" result)

    sprintf "%f" result
    |> log.Info
There are a couple of interesting things to note here. First, even though the rateMessage is an output, it is not handled as a function return value, but passed by reference. In other words, we pass a reference to rateMessage in the Run function signature, making it available in that function scope. We can then assign it the value we want to see pushed as a message to the queue, as a raw string. By the same mechanism, we could then add more outputs to the function, say, pushing different messages to different queues, or writing to a blob.
You can also enqueue a batch of messages to a Queue, using an
ICollectorto collect multiple messages at once.
Save & Run - boom! The retrieve-rate function pulls exchange rates every 15 seconds from Yahoo, and posts it to the latest-rate queue, the post-rate function will pick up that message and post to Slack, which we can confirm:
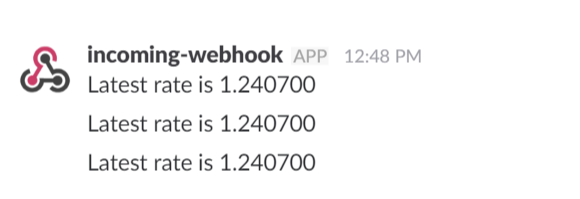
Ladies and gentlemen, drum roll - we have a working app.
Note that we didn’t have to manually create that queue. All we did was declare “I will use a queue called
latest-rate”; the function provisioned the corresponding queue automatically.
Disabling a function
Let’s face it, getting a Slack notification every 15 seconds is a bit annoying. Fortunately, we can temporarily disable a function. On the left-hand side of the dashboard, under the retrieve-rate function section, select Manage:
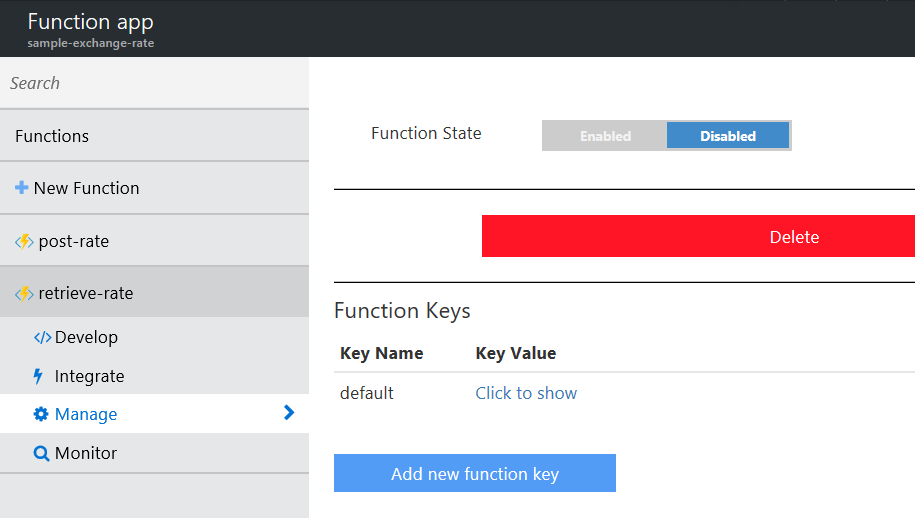
The Function State switch allows you to Enable and Disable that individual function, putting it temporarily off line if needed. Incidentally, this is also where you can go and entirely delete a function. Let’s click Disabled - this should immediately turn off the torrent of messages flooding our channel. If you go check the function.json file, you’ll also see that it changed, and shows now "disabled": true. You could also directly edit that file, with the same effect.
Using NuGet packages
We have a working function app already, and could stop there. However, we haven’t fully replicated the functionality of our original script. How would we go about using a NuGet package, such as FSharp.Data, to extract out the rate from the xml document we get back from Yahoo using a Type Provider?
Azure Functions use project.json files to manage Nuget dependencies. In the Develop section of the retrieve-rate function, let’s select View Files, and Add a new file, project.json:
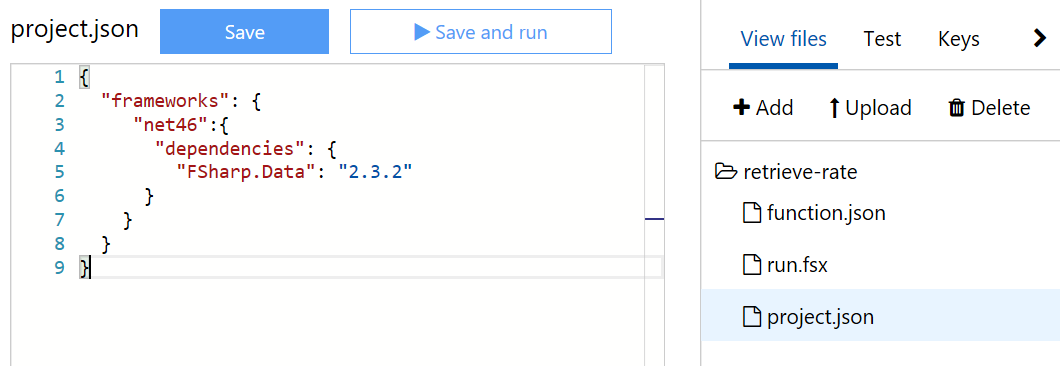
The contents should be pretty self-explanatory:
{
  "frameworks": {
     "net46":{
       "dependencies": {
         "FSharp.Data": "2.3.2"
      }
    }
  }
}
We specify the .NET framework version (4.6), and reference the NuGet package FSharp.Data as a dependency, with the specific version we want to use. Save, and take a look at the logs, where you should see something along these lines going on:
2017-03-04T14:20:04.630 Restoring packages.
2017-03-04T14:20:04.630 Starting NuGet restore
...
2017-03-04T14:20:10.485 Installing FSharp.Data 2.3.2.
2017-03-04T14:20:18.375 Committing restore...
...
2017-03-04T14:20:18.469 Restore completed in 12390ms.
Changes in the project.json file are detected, triggering a NuGet restore and installing the dependencies. Once the operation is complete, you should see a 4th file added to our folder, project.lock.json - and we should be able to reference FSharp.Data in our script, and use the XML type provider, instead of our quick-and-dirty parser. Let’s try that out:
open System
#r "System.Xml.Linq"
open FSharp.Data

// sample XML message
[<Literal>]
let sampleRate = """<query xmlns:yahoo="http://www.yahooapis.com/v1/base.rng" yahoo:count="1" yahoo:created="2017-02-11T19:56:24Z" yahoo:lang="en-US">
<results>
<rate id="GBPUSD">
<Name>GBP/USD</Name>
<Rate>1.2486</Rate>
</rate>
</results>
</query>"""

type Rate = XmlProvider<sampleRate>

let url = """http://query.yahooapis.com/v1/public/yql?q=select * from yahoo.finance.xchange where pair in ("GBPUSD")&env=store://datatables.org/alltableswithkeys"""

let getRate () =
    let response = Rate.Load(url)
    response.Results.Rate.Rate

let Run(timer: TimerInfo, rateMessage: byref<string>, log: TraceWriter) =
    log.Info(
        sprintf "F# Timer trigger function executed at: %s"
            (DateTime.Now.ToString()))

    let result = getRate ()

    rateMessage <- (sprintf "Latest rate is %f" result)

    sprintf "%f" result
    |> log.Info
Done! We ditched the reference to System.Net and WebClient, got rid of the parser, using FSharp.Data instead to directly give us statically typed results straight out of Yahoo.
Extracting and referencing the XML Sample
Let’s make another small improvement here. Hard-coding the XML sample right there inline is a bit displeasing to the eye, perhaps we should extract it into a separate file, and point the Type Provider to it.
Creating the file is easy; just as we did for the project.json file, let’s add a new file in the function folder, alongside our current 4 files, name it, say, sample.xml, and paste in our XML sample.
Referencing the file is equally easy; just as you would in a good old regular script, define a path, relative to the source directory, and pass it to the Type Provider:
// omitted for brevity

[<Literal>]
let sampleRate = __SOURCE_DIRECTORY__ + "/sample.xml"
type Rate = XmlProvider<sampleRate>
Save and Run… and we are done.
Sharing Code (and more)
What else could we do to make this code prettier?
One sore spot left is the message we are passing around. So far, we have been pushing around a raw string ““Latest rate is 123.456”; that is primitive at best. It would be much nicer to pass around a message with the information we care about, presented in a structured, self-explanatory manner, and let the second function decide how that should be formatted and posted to Slack.
The obvious candidate here is to use an F# Record type, something like:
type Message = {
    Rate: decimal
}
How are we going to pass that message around? Let’s take the easiest route first: we will define the type separately in each function, and use JSON.Net to serialize to/deserialize from the Queue.
As it turns out, JSON.Net is available out of the box in functions, so we don’t need to add it to the project.json dependencies. Instead, we can directly reference it in our scripts with #r.
Let’s modify retrieve-rate first, including JSON.Net and defining our Message type:
open System
#r "System.Xml.Linq"
open FSharp.Data
#r "Newtonsoft.Json"
open Newtonsoft.Json

type Message = {
    Rate: decimal
}
… and changing the code inside Run to now enqueue a JSON-serialized Message:
    let result = getRate ()
    let message =
        { Rate = result }
        |> JsonConvert.SerializeObject

    rateMessage <- message
Nice and crisp. Let’s now change the code on the receiving end of the queue, in post-rate, in a similar fashion:
// omitted for brevity

#r "Newtonsoft.Json"
open Newtonsoft.Json

type Message = {
    Rate: decimal
}

let Run(newRateMessage: string, log: TraceWriter) =

    log.Info(sprintf "F# Queue trigger function processing: '%s'" newRateMessage)

    let message =
        JsonConvert.DeserializeObject<Message>(newRateMessage)

    let slackMessage =
        message.Rate
        |> sprintf """{"text":"Rate : %f"}"""

    // rest unchanged
This is better - at least I think so.
Now what if we thought “this Message type is duplicated across two scripts, perhaps we should share it instead”? I’ll leave aside the question of whether or not avoiding that duplication is a good thing, and go ahead with that plan, as an example of what you could do if you wanted to share files across multiple functions in the same Function App.
So what we would like is for both scripts to rely on the same unique definition of Message. Let’s define that type in a file, saved somewhere on our local machine:
File Domain.fs
namespace Domain

type Message = {
    Rate: decimal
}
If we manage to upload it somewhere accessible by both functions, we should be able to then simply reference it with #load in both scripts.
To do that, we will be using Kudu. In the portal, below your list of functions, you’ll find a little menu Function app settings, which opens a boatload of choices.
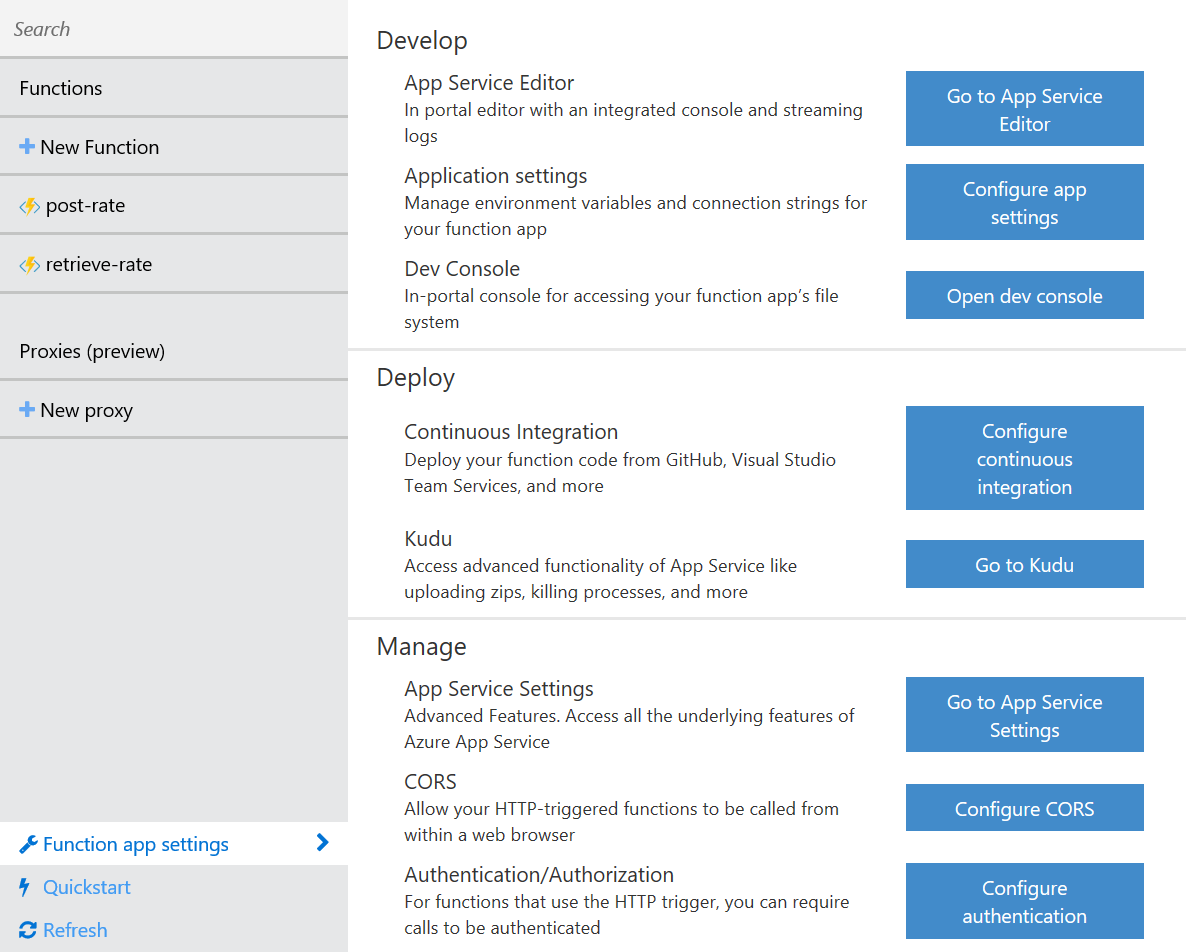
The one we care about is under the Deploy section, Go to Kudu. Let’s click and go to Kudu, then - a new browser window will pop up, with a file explorer (with 3 folders, data, logFiles, and site), and a console:
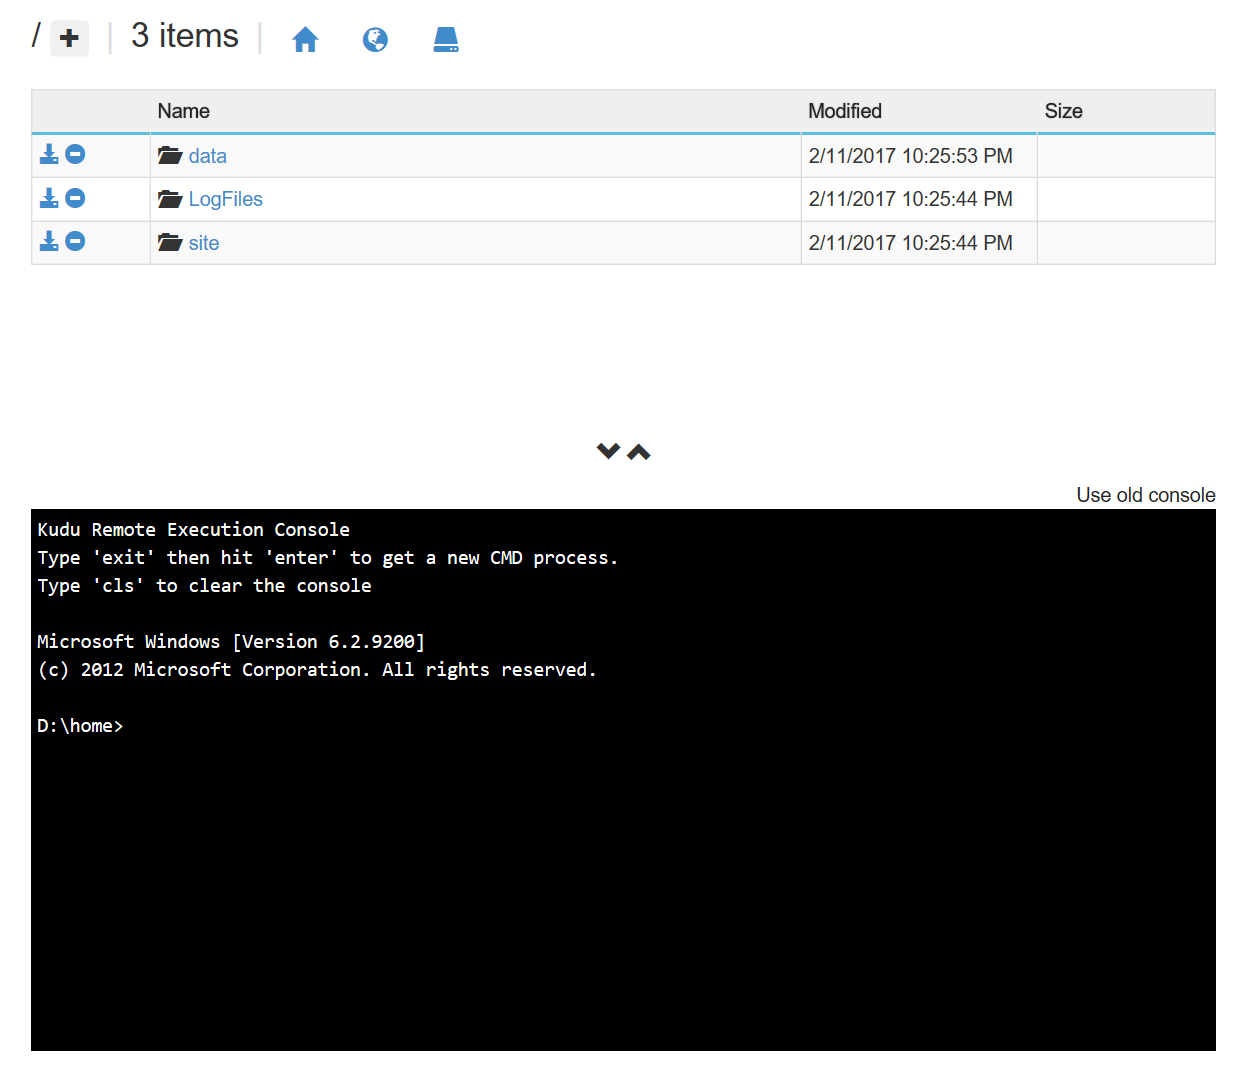
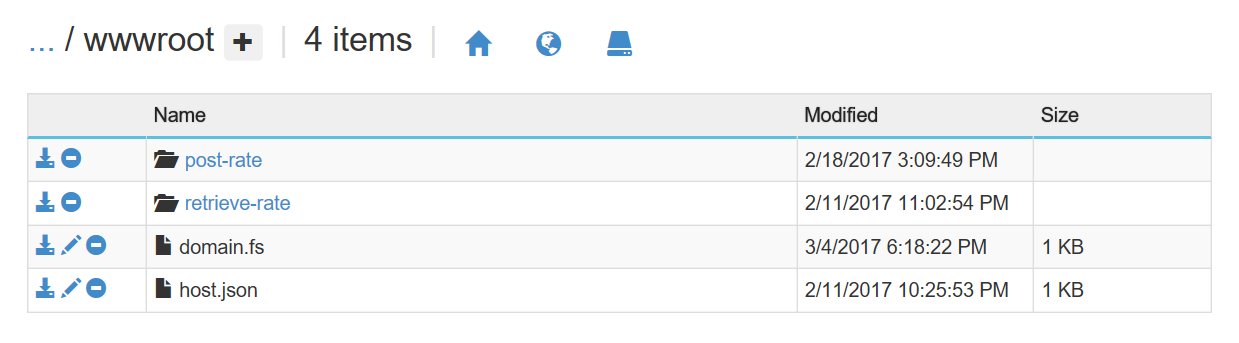
What’s happening here, is that we are on our “Serverless” server. We can use the command line, and navigate through the file system. Let’s navigate into site > wwwroot > retrieve-rate via the file explorer:
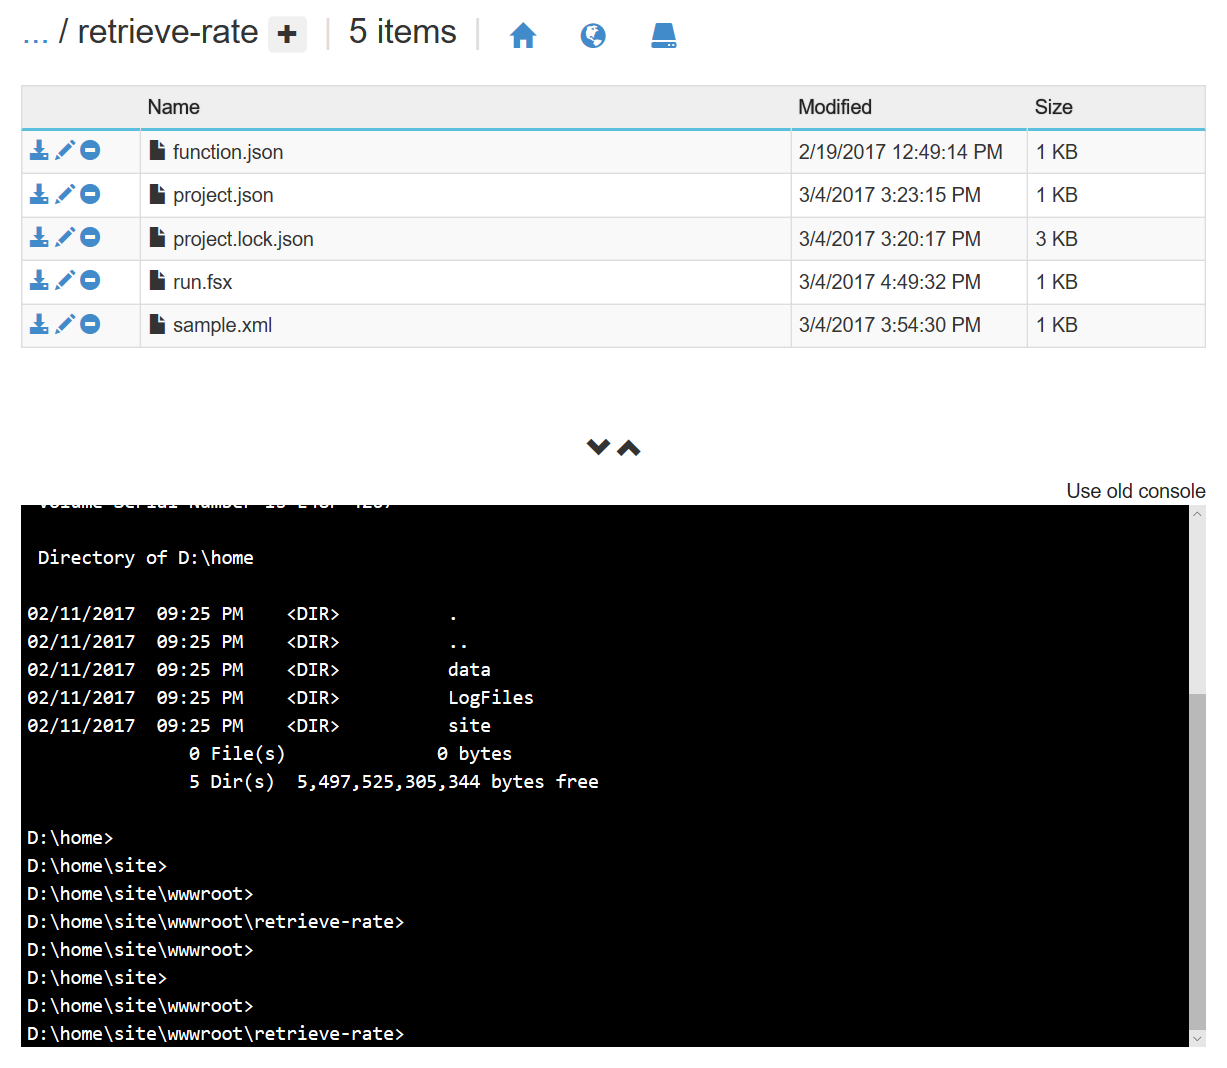
Look what we found there - the 5 files that define our retrieve-rate function. Also, note how the console reflects our navigation, with an explicit path to our location.
You could also navigate around via the command line, using
cd wwwrootand the like.
There is no reason to include Domain.fs in either of the function folders - that code should belong to neither. Let’s navigate one level up from the functions, in D: > site > wwwroot, and upload our file there, for instance by simply drag-and-drop’ing it over the file explorer section:
At that point, we can replace in both scripts the Message type definition by the following:
#load @"D:\home\site\wwwroot\Domain.fs"
open Domain
It’s not pretty, but it achieves what we were after: both functions are using the same Message type, loading it from a single shared file. More interestingly, we could upload and use anything we want to share, for instance our own dll.
I won’t discuss this topic deeper here, but I recommend taking the time to explore a bit the folder structure; this is quite helpful in figuring out how Azure Functions work behind the scenes.
Using Configuration
While we are in the Function app settings section, let’s quickly illustrate another useful feature. In the post-rate script, the URL we use to post to Slack is hard-coded in the script itself. That’s not great - it would be much nicer to pull it from a configuration file.
As it turns out, this is pretty straightforward. Under the Manage section, you’ll find an option to go to App service settings; let’s head there.
Among the many available choices, pick Application settings.
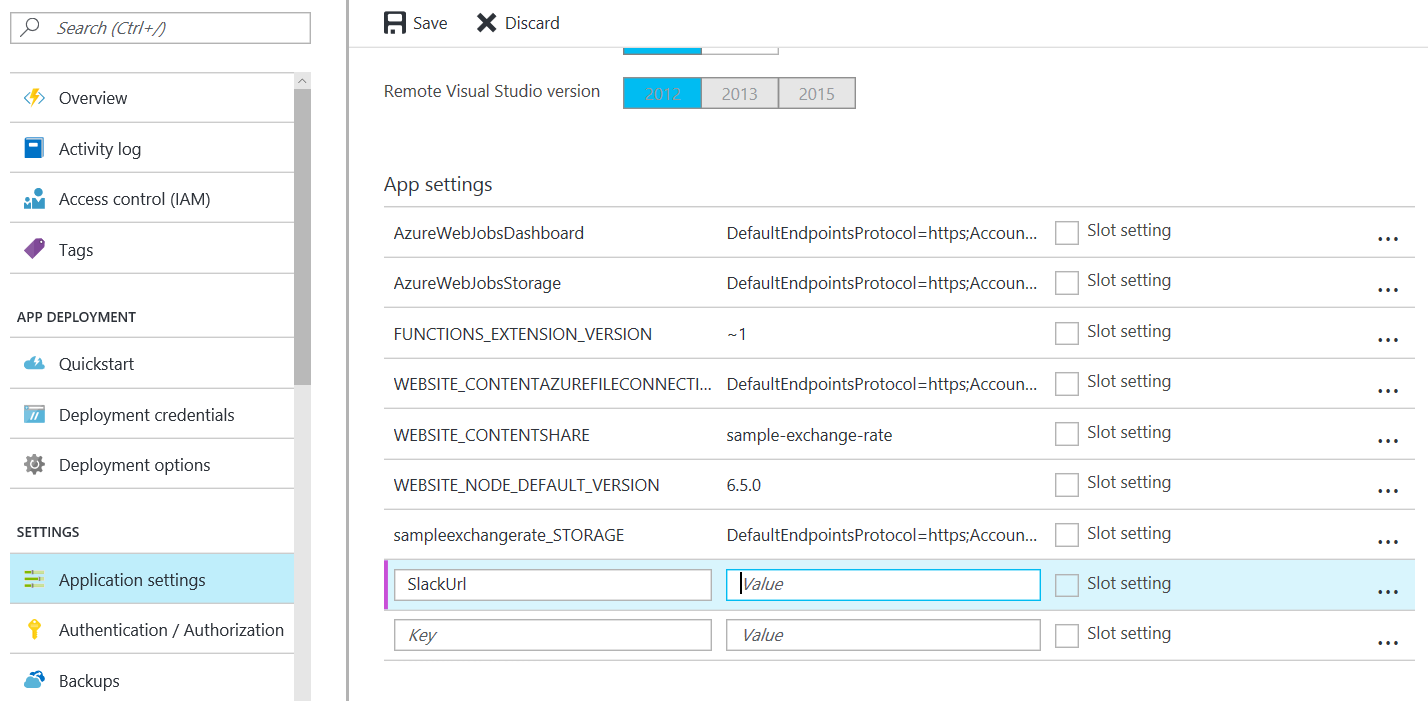
There you’ll find a configuration file, storing key/value pairs, which already contains the AzureWebJobsDashboard connection information to the Azure storage account we saw earlier.
Let’s add a new entry named SlackURL, associated with the URL to our Slack channel, and save.
All that’s left to do now is to replace the hard-coded value in post-rate:
// code omitted for brevity
open System.Configuration

let Run(newRateMessage: string, log: TraceWriter) =

    // omitted for brevity

    let client = new HttpClient()
    let message = new StringContent(slackMessage, Encoding.UTF8)
    let appSettings = ConfigurationManager.AppSettings
    let url = appSettings.["SlackURL"]
Continuous Deployment
Let’s cover a last topic for the road today: continuous deployment.
One nice aspect of Azure Functions is that there is virtually nothing to do to deploy code. Save your changes, and your code is immediately running in production. The downside is, we had to work from within the Azure Portal. The development experience is pretty decent, given the constraints, but it’s still not the tool I would pick as my first choice - and as a process, there are glaring issues.
In this post, I’ll leave aside the topic of how you would go about developing a function on your local machine, instead of in the online editor, in part because the tools involved are still in preview at the moment. I’ll probably revisit that question later on; in the meanwhile, if you are interested, take a look at the Azure Functions CLI.
The other obvious problem is the lack of versioning. We are currently more or less patching live code on our Serverless Server, and hoping for the best. At a minimum, source control would be nice.
The good news here is that Azure Functions continuous deployment support is quite nice. In the end, a Function App is just a collection of folders, one per function, each containing a couple of files. All we need is to ship the root folder, and all the nested contents and folders.
Out of the box, many scenarios are supported. We’ll go for GitHub.
First, we’ll create a naked GitHub repository, exchange-rate-azure-function.
Next, we need to retrieve the code we currently have, and move it to the repository. We can do that via Kudu: navigate to D:\home\site>, and download the wwwroot folder. The only change I made there was to remove the project.lock.json file from retrieve-rate.
I suspect that next step is not necessary, but I also deleted both functions from the Function App in the portal.
Finally, we’ll point the Function App to the GitHub repository, so that every time code is pushed, a deployment is triggered. In the Function app settings section, under Deploy, select Configure continuous integration. This will open a couple of options:
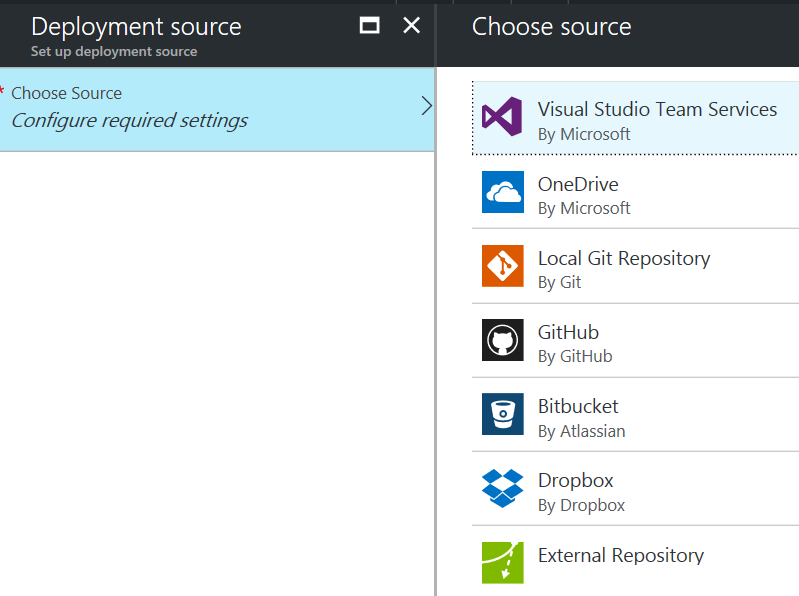
We’ll pick GitHub, select the appropriate repository and branch, and provide some credentials; at that point, we should be done. Let’s confirm that, and push the code to the repository. Quickly after, if we go back to the Azure Portal, you’ll see that the functions are back, with a minor change:
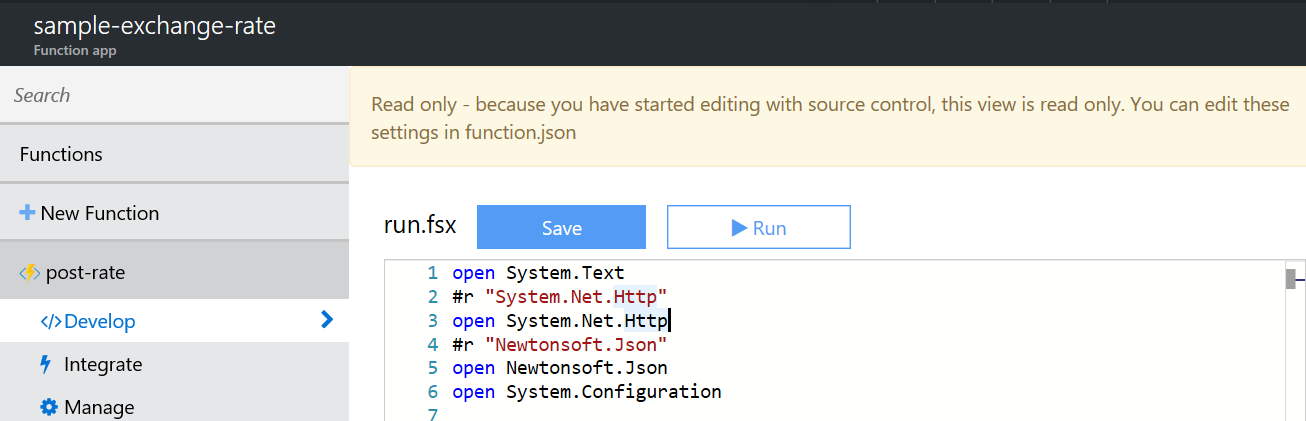
At the top of the screen, we have a note, stating the following:
Read only - because you have started editing with source control, this view is read only. You can edit these settings in function.json
From now on, instead of working through the Portal, you can edit the files locally; push your changes, and they will be immediately propagated to your Function App.
Note that the configuration file is not part of the repository, allowing you to share the code without sharing all your “secrets” at the same time.
Conclusion
That’s where we we leave things for now. As a quick recap, here is what we did: we took a small but non trivial F# local script, and with minimal changes, we turned it into an Azure Function application, connecting two functions with a queue. In the process, we illustrated a couple of features (using NuGet packages, uploading files, storing secrets in configuration, deploying from GitHub) which you’ll probably need if you want to build anything interesting with Functions.
This is obviously not a complete tutorial on Azure Functions. I plan on writing more on the topic in the near future, in particular around local development, and development workflow more generally. There are two things that I hope came through though. First, Azure Functions are dead-simple to use, and applicable in a lot of scenarios; then, they are a great fit with F#, making it possible to rapidly sketch out and run both the domain and architecture of a full application.
At any rate, I hope this will help you get started with Azure Functions and F# on the right foot; and if you have specific questions or requests… ping me!